Configuring a MikroTik L2TP/IPSec VPN Server on MikroTik: A Beginner’s Guide
Introduction
The Layer 2 Tunnelling Protocol (L2TP), combined with Internet Protocol Security (IPSec), provides a secure and efficient VPN solution. This guide will walk you through setting up an MikroTik L2TPVPN server using IPSec on a MikroTik router, ensuring robust security and seamless connectivity.
What is L2TP/IPSec?
L2TP is a VPN protocol used to establish a secure tunnel between two endpoints over the internet. While L2TP itself handles the tunnelling, it does not encrypt the traffic. This is where IPSec comes in—it encrypts the data within the tunnel, ensuring both privacy and security. Together, they form a reliable and widely-supported VPN setup.
Advantages of L2TP/IPSec
- Enhanced Security: Combining L2TP with IPSec ensures strong encryption and authentication, protecting data from interception.
- Cross-Platform Compatibility: Supported by most operating systems, including Windows, macOS, Android, and iOS.
- NAT Traversal: Functions well even in environments using Network Address Translation (NAT), making it versatile for various networks.
- Ease of Configuration: Simple to set up on MikroTik devices using the built-in tools.
Disadvantages of L2TP/IPSec
- Reduced Speeds: The encryption process can lead to slower performance compared to less secure VPN protocols.
- Limited Customisation: Compared to some advanced VPN solutions, L2TP/IPSec offers fewer configuration options.
- Firewall Setup: Requires specific ports to be open (UDP 500, UDP 1701, and UDP 4500), which can be challenging in highly restrictive environments.
Why Use MikroTik for L2TP/IPSec?
MikroTik routers offer a cost-effective and feature-rich platform for setting up VPNs. With their intuitive WinBox interface and extensive documentation, MikroTik devices are an ideal choice for small to medium-sized businesses seeking robust networking solutions.
What You’ll Learn in This Tutorial
- How to enable and configure L2TP on a MikroTik router.
- How to integrate IPSec for secure encryption.
- How to manage user accounts and set up authentication.
- How to test your L2TP/IPSec VPN connection.
By the end of this tutorial, you’ll have a fully operational L2TP/IPSec VPN server ready to provide secure remote access to your network.
Step 1: Configuring the VPN Server
For the server we will be using a MikroTik CHR instnace hosted in AWS, however this can be any Internet-facing MikroTik Router
Click here to see how to provision a MikroTik CHR in AWS using the Free Tier option
Start by navigating to IP > Pool. This step is for creating the IP pool to be given out to the remote clients connecting. For this we give it a name vpn_pool and a range of 10.1.254.10 – 10.1.254.20. This is within the scope of the Bridge we’ve already configured on the CHR (VPN_BRIDGE / 10.1.254.1/24):

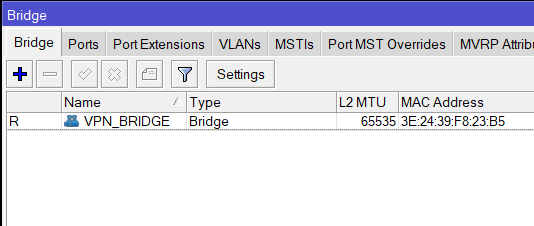
/interface bridge
add name=VPN_BRIDGE protocol-mode=none
/ip pool
add name=vpn_pool ranges=10.1.254.10-10.1.254.20
/ip address
add address=10.1.254.1/24 interface=VPN_BRIDGE network=10.1.254.0Now go to PPP > Profiles and Add a new one and add the following elements:
| Name: l2tp-profile Local Address: 10.1.254.1 Remote Address: vpn_pool DNS Server: 10.1.254.1 (optional – to use the CHR as the DNS server) |

/ppp profile
add dns-server=10.1.254.1 local-address=10.1.254.1 name=l2tp-profile remote-address=vpn_pool
Next is now to enable the L2TP Server:
| Enalbed: Yes Default Profile: l2tp-profile User IPsec: yes IPsec Secret: <a strong password> |

/interface l2tp-server server
set caller-id-type=number default-profile=default enabled=yes use-ipsec=yes  ipsec-secret=Str0ngP@ssWord
Finally configure the client profile:
| Name: router-test-01 Password: <password> Service: l2tp Profile: l2tp-profile Local Address: 10.1.254.1 Remote Address: 10.1.254.100 (this could also be the vpn_pool if client IP can be provided dynamically) |

/ppp secret
add local-address=10.1.254.1 name=router-test-01 password=helloworld123 profile=l2tp-profile remote-address=10.1.254.100 service=l2tp
Client Configuration
As we’re doing MikroTik Router to MikroTik Router the client is a MikroTik hAP.
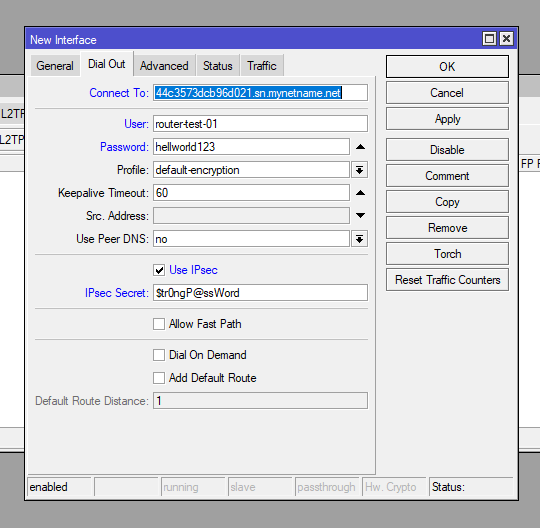
On the client MikroTik go to PPP > Interface and then add a L2TP Client

Add the following on the General and Dial Out tabs:
| General | Dial Out |
| Name: l2tp-out | Connect To: <public IP or DNS name of VPN server> User: router-test-01 Password: <user-password> Use IPsec: Yes IPsec Secret: <L2TP Password> |

/interface l2tp-client
add connect-to=44c3573dcb96d021.sn.mynetname.net disabled=no name=l2tp-out1 use-ipsec=yes user=router-test-01 password=helloworld123 ipsec-secret=Str0ngP@ssWord
Wait a few moments then you’ll see an R appear showing the client is runnig.

You can then confirm on the server under PPP > Active Connections

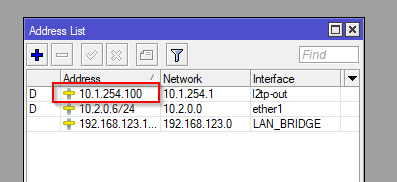
Then you can confirm the Addresses on both VPN server and client

Next Options
Now to confirm routing you can add a static route on each router for the opposite sites LAN address pointing to the L2TP IP address. Watch the YouTube video to see this step.

